In today’s fast-paced world of digital communication, managing your email efficiently is crucial. Microsoft Outlook is a handy tool that, when used effectively, can greatly improve your email organization and overall experience. Here are seven practical tips and tricks to help you make the most of Outlook and keep your inbox well-organized
1. Leverage Folders and Subfolders
One of the foundational steps in organizing your emails is to create folders and subfolders. Segregate your emails based on categories, projects, or priority levels. For example, you can establish folders like “Work,” “Personal,” and “Newsletters,” and within them, create subfolders for specific projects. This structure allows for easy access and retrieval of emails.
Here’s how to create a subfolder in Outlook:
- Step 1: Open Outlook and Navigate to Your Inbox
- Launch Microsoft Outlook and go to your inbox, where you want to create the subfolder.
- Step 2: Right-click on the Parent Folder
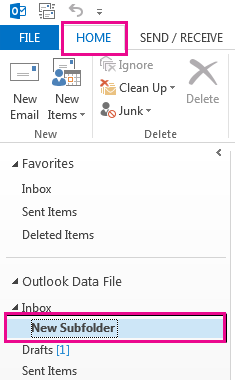
- Identify the parent folder under which you want to create a subfolder. For example, if you want to create a subfolder under “Work,” right-click on the “Work” folder in the left-hand navigation pane.
- Step 3: Select “New Folder” from the Context Menu
- After right-clicking, a context menu will appear. From this menu, select the option labeled “New Folder.”
- Step 4: Name Your Subfolder
- A dialog box will pop up asking you to enter a name for your new folder. Give it a descriptive name that reflects the category or project it will contain.
- Step 5: Choose the Location for the New Folder
- Under the “Select where to place the folder” section, ensure that the correct parent folder is selected. In this example, it should be “Work.” If not, use the drop-down menu to choose the appropriate parent folder.
- Step 6: Opt to Create a Subfolder
- If you want to create a subfolder under the newly created folder, select the option “Folder contains” and choose “Mail and Post Items” from the drop-down menu. This will ensure that the new folder can store emails.
- Step 7: Click “OK” to Create the Subfolder
- Once you’ve named your subfolder and confirmed the location, click the “OK” button. You’ll now see the subfolder listed under the parent folder in the navigation pane.
- Step 8: Repeat as Needed
- If you have additional subcategories or projects you’d like to organize, simply repeat the process by right-clicking on the appropriate parent folder and selecting “New Folder.”
2. Set Up Rules and Filters
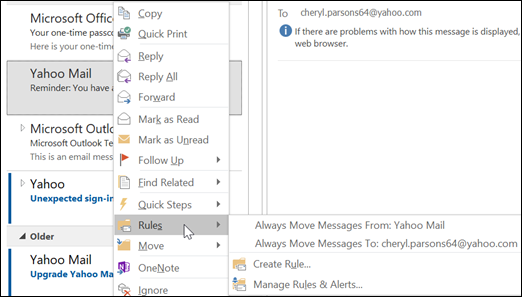
Automation is your best friend in email management. Outlook’s rules and filters allow you to automate the organization process. Define conditions that trigger specific actions for incoming emails. Automatically moving emails from a particular sender to a designated folder or marking them as important can save you time and ensure your inbox stays organized.
Here’s how to set up a rule and filter:
- Step 1: Open Outlook and Go to the “File” Tab
- Click on the “File” tab in the top left corner of the Outlook window.
- Step 2: Select “Manage Rules & Alerts”
- In the Account Information section, click on “Manage Rules & Alerts.”
- Step 3: Click on “New Rule”
- In the Rules and Alerts dialog box, click on “New Rule” to start creating a new rule.
- Step 4: Choose a Template or Start from Scratch
- Select a template or start from a blank rule. Follow the prompts to define conditions and actions for the rule.
- Step 5: Test the Rule and Save
- After setting up the conditions and actions, test the rule to ensure it functions as intended. Click “Next” and then save the rule.
- Step 6: Review and Apply Rules
- Back in the Rules and Alerts dialog box, review and apply the rules you’ve created. Outlook will now automatically process incoming emails according to your defined rules.
3. Master the Flagging System:
Flags serve as visual reminders for important emails that need your attention. Categorize flags based on urgency, deadlines, or follow-up actions. This ensures that crucial tasks don’t fall through the cracks, and you can easily track your priorities. This combined with a solid task management system to complete your tasks starting with highest priority first is key. We recommend checking out TaskOrbiter and its powerful task management features!
Here’s how to set up a flag:
- Step 1: Open Outlook and Navigate to Your Inbox:
- Launch Microsoft Outlook and go to your inbox.
- Step 2: Select an Email to Flag:
- Open the email you want to flag for attention.
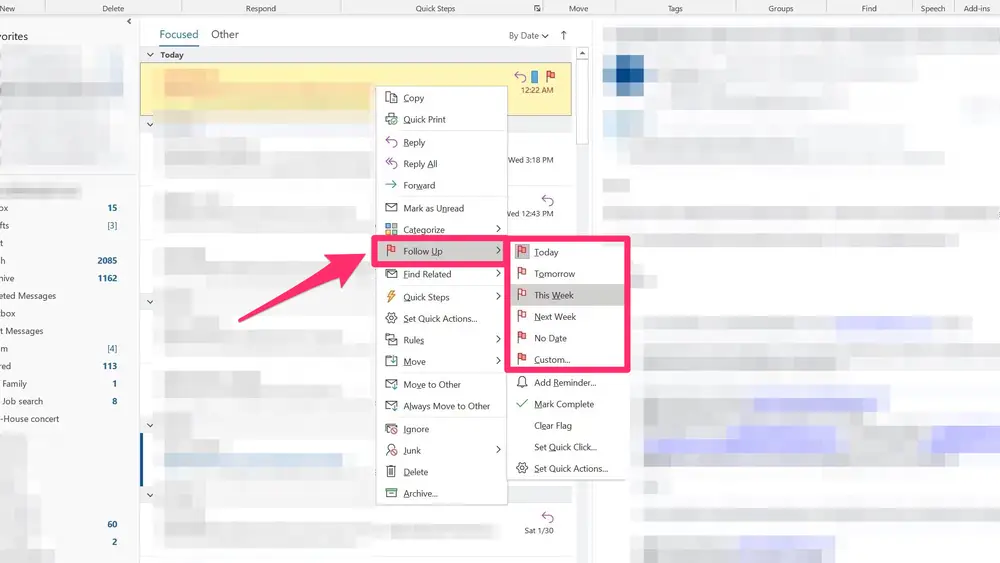
- Step 3: Click the Flag Icon:
- In the toolbar above the email, you’ll find a flag icon. Click on it to flag the email.
- Step 4: Choose Flag Options:
- A drop-down menu will appear with options like “Today,” “Tomorrow,” “This Week,” etc. Select the appropriate timeframe for the task associated with this email.
- Step 5: View Flagged Emails:
- To view all flagged emails, click on the “Tasks” icon in the bottom left corner of the Outlook window.
4. Utilize Categories and Labels
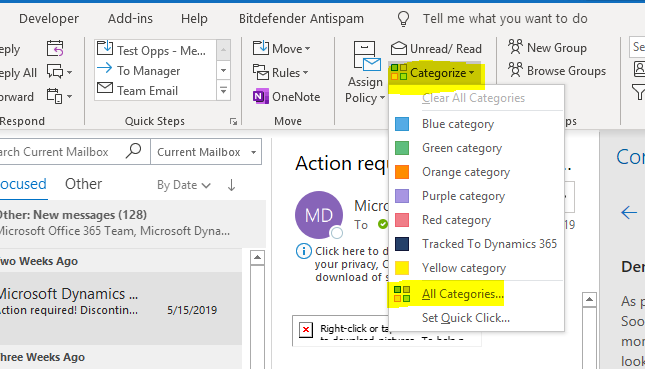
Categories and labels provide a visual way to differentiate between different types of emails. Assign colors to categories such as “Urgent,” “Follow-up,” or “Completed” to quickly identify their status. This feature proves invaluable when dealing with a high volume of emails and needing to focus on specific tasks or projects.
Here’s how to configure categories & labels:
- Step 1: Open Outlook and Navigate to Your Inbox:
- Launch Microsoft Outlook and go to your inbox.
- Step 2: Select an Email to Categorize:
- Open the email you want to categorize.
- Step 3: Click on the Categorize Icon:
- In the toolbar above the email, find the categorize icon (it looks like a little tag). Click on it.
- Step 4: Choose a Category:
- Select the appropriate category from the list or create a new one.
- Step 5: View Categorized Emails:
- In the left-hand navigation pane, you can click on a category to view all emails associated with it.
5. Optimize Search and Filters:
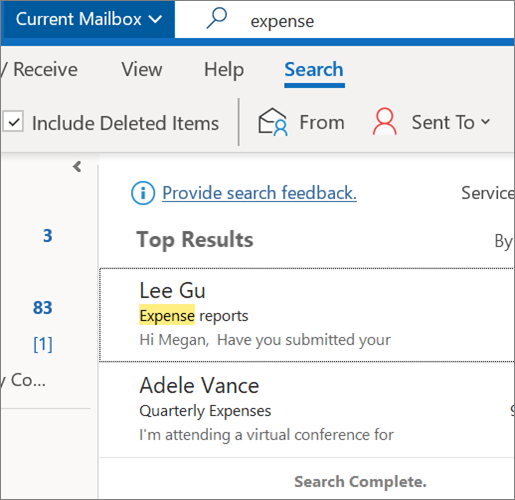
Outlook’s search functionality is robust. Utilize advanced search filters to narrow down results by sender, subject, date, or keywords. Save frequently used search queries for even faster access to important information.
Here’s how to optimize your search & filters:
- Step 1: Open Outlook and Click on the Search Bar:
- Launch Microsoft Outlook and locate the search bar at the top of the window.
- Step 2: Enter Your Search Query:
- Type in keywords, sender names, or other criteria related to the email you’re looking for.
- Step 3: Utilize Filters (Optional):
- Click on the filter options like “From,” “Subject,” “Has Attachments,” etc., to refine your search.
- Step 4: Review Search Results:
- Outlook will display a list of emails that match your search criteria.
- Step 5: Save Frequent Searches (Optional):
- For recurring searches, click the small disk icon next to the search bar to save the search query for easy access.
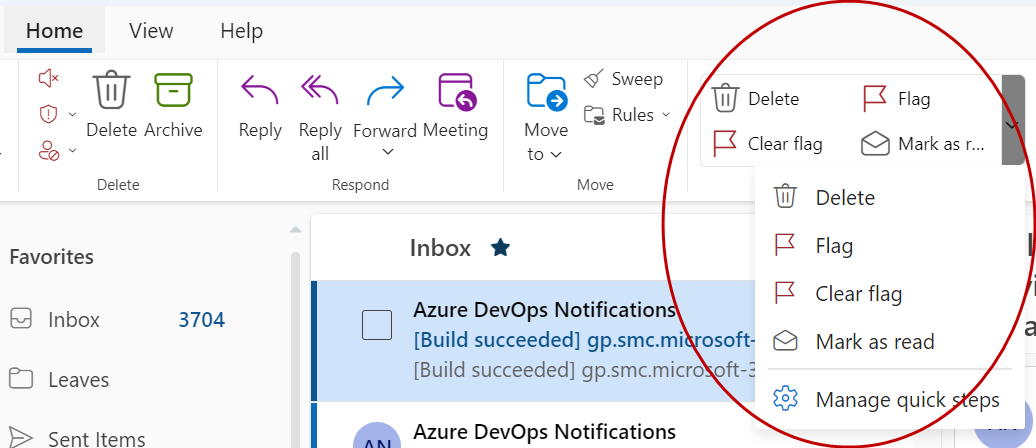
6. Utilize Quick Steps for Common Tasks
Quick Steps is a feature in Outlook that allows you to perform multiple actions with a single click. Customize Quick Steps for common tasks like moving emails to specific folders, forwarding them to a group, or flagging them for follow-up. This feature saves time and streamlines your email management process.
Looking to combine a powerful task management system alongside these email tips? Check out how TaskOrbiter’s Kanban boards can help with breaking up your task into customizable sections, tailored statuses & priorities and so much more! Try TaskOrbiter for FREE today!
Here’s how to use quick steps:
- Step 1: Open Outlook and Go to the Home Tab:
- Launch Outlook and ensure you are in the “Home” tab.
- Step 2: Locate the Quick Steps Group:
- Look for the “Quick Steps” group in the ribbon at the top of the window.
- Step 3: Click “Create New”:
- In the Quick Steps group, click “Create New” to start setting up a new Quick Step.
- Step 4: Name Your Quick Step:
- In the “Edit Quick Step” dialog box, give your Quick Step a descriptive name.
- Step 5: Choose Actions for the Quick Step:
- Select the actions you want this Quick Step to perform, such as moving emails, forwarding them, marking as read, etc.
- Step 6: Set Options (Optional):
- Depending on the actions you’ve chosen, you may need to configure additional options. Follow the prompts.
- Step 7: Click “Finish” to Save:
- Once you’re satisfied with the settings, click “Finish” to save the Quick Step.
- Step 8: Apply Quick Steps:
- To use a Quick Step, select the email(s) you want to apply it to, then click the Quick Step from the ribbon.
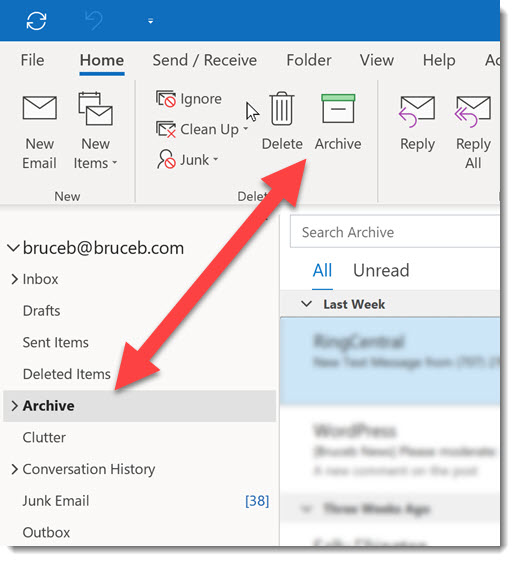
7. Regularly Archive or Delete Old Emails:
To prevent inbox clutter, regularly archive or delete old emails. Outlook’s archive feature allows you to store emails in a separate folder without deleting them permanently. Set up automatic archiving rules to keep your inbox tidy and ensure you only see relevant, current messages.
Here’s how to delete your old emails:
- Step 1: Open Outlook and Go to Your Inbox:
- Launch Outlook and go to your inbox.
- Step 2: Select and Sort Emails:
- Select the emails you want to archive or delete. You can sort by date, sender, or other criteria to identify older messages.
- Step 3: Archive Emails:
- To archive, right-click on the selected emails and choose “Archive.” Follow any prompts to confirm.
- Step 4: Delete Emails:
- To delete, press the “Delete” key on your keyboard or right-click and select “Delete.”
- Step 5: Empty Deleted Items Folder (Optional):
- If you’ve deleted emails, remember to periodically empty the “Deleted Items” folder to free up space.
Implementing these seven tips and tricks will transform your Outlook experience, making you a more efficient email manager. Organizing your inbox not only saves time but also reduces stress, ensuring you never miss important messages or tasks. Customize Outlook to suit your specific needs, and watch your productivity soar. Happy emailing!